前回の記事でPayjpを用いた単発決済の実装方法を解説した。
そこで今回は、Payjpで定期課金機能を実装してみたいと思う。
想定
有料会員登録としてカード登録をしないと、主要なサービスが使えないWebアプリを想定する。
以下のような仕様であるとする。
- 定期課金のプランは1つだけ
- トライアル期間などはなし
- カード登録をした瞬間に初回決済が走る
- 有料プランの期間中に退会しても日割りの返金はなし
- 決済日は前回決済日から1ヶ月後
モデル
Userモデルとそれに紐付くPaymentHistoryモデルを作成する。またプランは1つしかないが、PlanMasterモデルを用意しておく。
# app/models/user

# == Schema Information
#
# Table name: users
#
#  id                             :bigint   not null, primary key
#  payjp_customer_id(Payjp顧客ID)  :string   default("")
#  payjp_subscription_id          :string   default("")
#  created_at                     :datetime not null
#  updated_at                     :datetime not null
#  その他認証に必要な情報

class User < ApplicationRecord
  has_many :payment_histories
end
# app/models/payment_history

# == Schema Information
#
# Table name: payment_historyies
#
#  id                                  :uuid             not null, primary key
#  amount                              :integer          default(0), not null
#  error_detail                        :string
#  error_message                       :string
#  status(決済ステータス)                :integer          default("before_payment"), not null
#  created_at                          :datetime         not null
#  updated_at                          :datetime         not null
#  charge_id(Payjp決済ID)               :string           default(""), not null
#  user_id                             :uuid             not null
#
# Indexes
#
#  index_orders_on_user_id  (user_id)

class PaymentHistory < ApplicationRecord
  belongs_to :user

  enum status: {
    before_payment: 0, # 未決済
    completed: 1, # 決済完了
    failed: 2, # 決済失敗
  }
end
# app/models/plan_masters

# == Schema Information
#
# Table name: plan_masters
#
#  id                           :bigint           not null, primary key
#  name(プラン名)               :string           default(""), not null
#  created_at                   :datetime         not null
#  updated_at                   :datetime         not null
#  payjp_plan_id(PayjpプランID) :string           default(""), not null
#
# Indexes
#
#  index_plan_masters_on_payjp_plan_id  (payjp_plan_id)
#

class PlanMaster < ApplicationRecord
end
プランの作成
まず、Payjp側でプランを作成する。Payjpの管理画面にログインし、サイドバーの「プラン」をクリックすると下記の様な画面が出て来る。

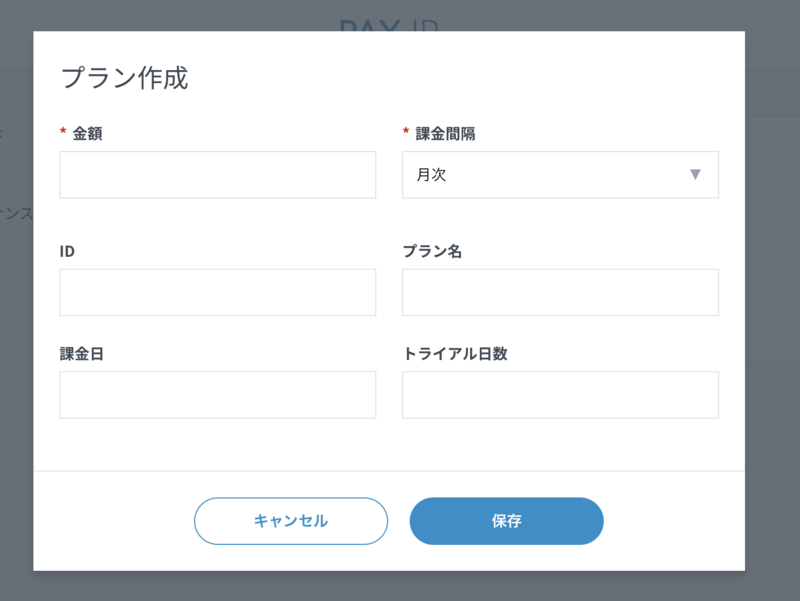
「プラン作成」をクリックする作成モーダルが開くので、金額、課金間隔、ID、プラン名を入力する。IDはPayjp側のプランIDのことで、プランを作成したらこれをコピーしてPlanMasterモデルのpayjp_plan_idに保存しておく。
定期課金登録
ユーザーが定期課金を開始するためのロジックを作っていく。
チェックアウト
こちらは前回の記事で解説したので省略。
顧客情報の登録/定期課金の登録
まず、顧客情報をPayjp側で登録する必要がある。
# app/controllers/payjp/customers_controller.rb

class Payjp::CustomersController < ApplicationController
  def create
    Payjp.api_key = ENV["PAYJP_SECRET_KEY"]
    # responseにはPayjp::Customerオブジェクトが返ってくる
    response = Payjp::Customer.create(
      card: @payjp_token,
      metadata: { user: current_user.id } # payjp側のmetadataとしてRails側のuser_idを渡す
    )
    current_user.update(payjp_customer_id: response.id)

    redirect_to 'リダイレクト先のpath'
  rescue Payjp::PayjpError => e
    render 'render先のアクション'
  rescue StandardError => e
    render 'render先のアクション'
  end
end
顧客が登録できたら、定期課金を登録するロジックを追加する。
# app/controllers/payjp/customers_controller.rb

class Payjp::CustomersController < ApplicationController
  def create
    Payjp.api_key = ENV["PAYJP_SECRET_KEY"]
    # 顧客の登録
    response = Payjp::Customer.create(
      card: @payjp_token,
      metadata: { user: current_user.id }
    )
    current_user.update(payjp_customer_id: response.id)

    # 定期課金の登録
    subscription_response = Payjp::Subscription.create(
      plan: Plan.first.payjp_plan_id, # 先ほど登録したプラン
      customer: current_user.payjp_customer_id
    )

    redirect_to 'リダイレクト先のpath'
  rescue Payjp::PayjpError => e
    render 'render先のアクション'
  rescue StandardError => e
    render 'render先のアクション'
  end
end
ここでは1つのアクションの中で顧客の登録と定期課金の登録を行なっているが、実際に使う際は個別の用途に合わせて欲しい。
決済情報の登録
ここまで出来たらあとは決済情報を保存する仕組みを作るだけ。
Payjpではwebhookが用意されており、イベントが発生すると登録されているURLにリクエストを投げてくれる。
Payjp側に定期課金登録を行なったら自動で決済してくれるので、webhookリクエストを受け取るためのapiを用意してあげればいい。
詳細はこちら
まずはPayjpの管理画面からWebhookトークンを取得する。管理画面サイドバー「API」をクリックして下の方にスクロールすると、Webhookの欄があり、発行元トークンという項目がある。

これを環境変数としてPAYJP_WEBHOOK_SIGNATUREで定義する。
# app/controllers/payjp/charges_controller.rb

class Payjp::ChargesController < ApplicationController
  before_action :payjp_webhook_auth, only: %i(create)

  # webhookを発火させるイベントを選択することは出来ないので、決済が成功/失敗したイベントに限定する
  PAYJP_REQUEST_TYPE = ['charge.succeeded', 'charge.failed']

  def create
    # payjp_params[:type]がPAYJP_REQUEST_TYPEに含まれていなければreturn
    return unless PAYJP_REQUEST_TYPE.include?(payjp_params[:type])

    user = User.find_by(payjp_customer_id: payjp_params[:data][:customer])
    payment_history = user.payment_histories.create(
      payed_on: Date.today,
      payment_amount: payjp_params[:data][:amount],
      payjp_charge_id: payjp_params[:data][:id]
    )
    unless is_charge_succeed
      payment_history.update(
        status: :failed,
        failure_code: payjp_params[:data][:failure_code],
        failure_message: payjp_params[:data][:failure_message]
      )
    end
    render status: 201
  end

  private

  def payjp_webhook_auth
    # トークンとHTTP_X_PAYJP_WEBHOOK_TOKENが違えば401を返却する。
    if request.headers["HTTP_X_PAYJP_WEBHOOK_TOKEN"] != ENV['PAYJP_WEBHOOK_SIGNATURE']
      render status: 401, json: { message: 'Unauthorized' } and return
    end
  end

  # 主要なデータはparams[:data]の中にある
  def payjp_params
    params.permit(
      :type,
      data: [
        :id,
        :amount,
        :customer,
        :subscription,
        :failure_code,
        :failure_message
      ]
    )
  end

  def is_charge_succeed
    payjp_params[:type] == PAYJP_REQUEST_TYPE[0]
  end
end
これでPayjpで決済が行われたときに、その情報をRails側でも拾えるようになった。
ちなみに、定期課金登録時の初回決済もWebhookで拾うことが出来る。
Webhookが本当に飛んでくるか確認
最後に、Webhookが本当に飛んでくるか確認をしたいと思う。ローカル環境のままだとWebhookを利用できないので、public URLを発行してくれるngrokを使う。
まずはインストール
$ brew install ngrok
$ ngrok --version
ngrok version 2.3.35
ローカルで起動しているページのポート番号を入れ起動
ngrok http 3000
こんな画面が出れば成功
Session Status                online
Session Expires               7 hours, 59 minutes
Version                       2.3.35
Region                        United States (us)
Web Interface                 http://127.0.0.1:4040
Forwarding                    http://6gt2gc45.ngrok.io -> http://localhost:3000
Forwarding                    https://6gt2gc45.ngrok.io -> http://localhost:3000

Connections                   ttl     opn     rt1     rt5     p50     p90
                              0       0       0.00    0.00    0.00    0.00
ここで得られたhttp://6gt2gc45.ngrok.io/payjp/chargesをPayjp管理画面でWebhookに登録する。

テストイベントを送信をクリックして、URLを先ほどのURL、イベント種類をcharge.succeededを選択し送信する。
おそらくエラーになるはずだが、ローカルで何らかのログが出たら成功している。
あとは開発環境で決済してみて、問題なく動作すれば完了。
まとめ
以上で定期課金機能を実装することが出来た。
Payjpはとても使いやすいので、決済サービスで悩んだ際は一度使ってみて欲しい。
次回は今回作成したコントローラーのテストを、Payjpのモックを作りながら解説したいと思う。